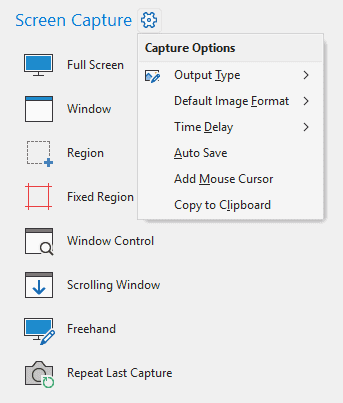
Screen Capture
PicPick can capture the whole desktop, a single window, a region, a fixed-size region, a window control, a scrolling window, a freehand region, or repeat the previous capture.
1. Capture Modes
| Capture mode | What it captures | Typical use |
|---|---|---|
| Full Screen | The entire desktop. If multiple-monitor capture is enabled, all monitors may be included. | Capturing everything visible on the desktop. |
| Window | A selected application window. | Capturing a program window without the rest of the desktop. |
| Region | A rectangular area selected by dragging. | Capturing a chosen portion of the screen. |
| Fixed Region | A rectangular area with a predefined size. | Taking repeated screenshots with the same width and height. |
| Window Control | A control or smaller UI element inside a window. | Capturing a button, panel, menu, toolbar, or other interface component. |
| Scrolling Window | Scrollable content that extends beyond the visible screen. | Capturing long web pages, documents, lists, or panels. |
| Freehand | An irregular area drawn manually. | Capturing only a custom-shaped part of the screen. |
| Repeat Last Capture | Repeats the most recent capture mode and settings. | Quickly repeating a previous capture. |
2. Capture Options Menu
Click the gear beside Screen Capture to open the capture options menu.
| Menu item | Purpose |
|---|---|
| Output Type | Selects where the capture result goes after capture. The Options screenshot shows PicPick Editor as an output type. |
| Default Image Format | Selects the default image format used by capture saving workflows. The File Name options page shows PNG (*.png) as the selected format in the supplied screenshot. |
| Time Delay | Adds a delay before the capture starts. The Capture options page shows No Delay as the selected value. |
| Auto Save | Toggles automatic saving for captured images. The Auto Save options page controls the destination folder. |
| Add Mouse Cursor | Adds the mouse cursor to captures. The Capture options page has the related Include cursor image setting. |
| Copy to Clipboard | Copies captured images to the clipboard. The Capture options page has the related Always copy captured images to the Clipboard setting. |
3. Capture Output Behavior
Capture output behavior can be configured from Options > Capture. In the supplied screenshot, the output type is PicPick Editor, which means captured images open in the editor for annotation and saving.
Common output behaviors include:
| Behavior | Result |
|---|---|
| Open in PicPick Editor | The screenshot opens in the editor. |
| Auto Save | The screenshot is saved automatically to the configured folder. |
| Copy to Clipboard | The screenshot is copied so it can be pasted into another app. |
| External Program | The screenshot can be sent to a configured program from the Auto Save / External Program setup. |
4. Capture Tips
- Enable Time Delay when you need to capture a menu, tooltip, hover state, or temporary screen state.
- Enable Include cursor image when the pointer position is important to the explanation.
- Enable Darken outside of the selection to make region capture easier to see.
- Enable the Magnifier Window and Display grid lines when you need precise pixel-level selection.
- Use Repeat Last Capture when documenting multiple screens with the same capture method.